The Dodge & Burn technique can be approached in different ways and there are many opinions on how to make certain parts of an image lighter or darker. In this article, we will discuss various methods and test them for effectiveness.
Dodge & Burn Tools (DE: Abwedler & Nachbelichter)
The Dodge & Burn tools in Photoshop have been available for a long time. Many users have experienced using the Dodge tool to brighten an area of the image, only to realize they’ve gone too far. They then use the Burn tool to compensate and end up with light and dark patches that don’t fit well together. As a result, many people avoid using these tools altogether.
So here we have listed a number of alternatives for you to choose from:
50% gray layer
However, a better approach is to create an additional layer filled with neutral gray (50% gray) and switch it to the “Linear Light” blending mode. This layer doesn’t change the image at first, but when made lighter or darker, it affects the image’s overall brightness. To fix a mistake, you can paint 50% gray to restore the image to its original state. Some users prefer using the “Soft Light” blending mode as it has a subtler effect, but it affects the saturation of the image, which should be taken into account.
Pro Tip: You can also leave the layer empty and paint with black or white – the effect is 100% the same and saves storage space.
Multiple RAW conversions
Another technique that can be helpful is using multiple RAW conversions that differ in exposure. You can use one conversion for skin tones, another for the background, and another for the hair, depending on what the image requires. Then, you can load these individual RAW conversions as layers in Photoshop and mask them accordingly. However, you should only use this technique at the very beginning and it can inflate the file size. So you have to be sure of your decisions here.
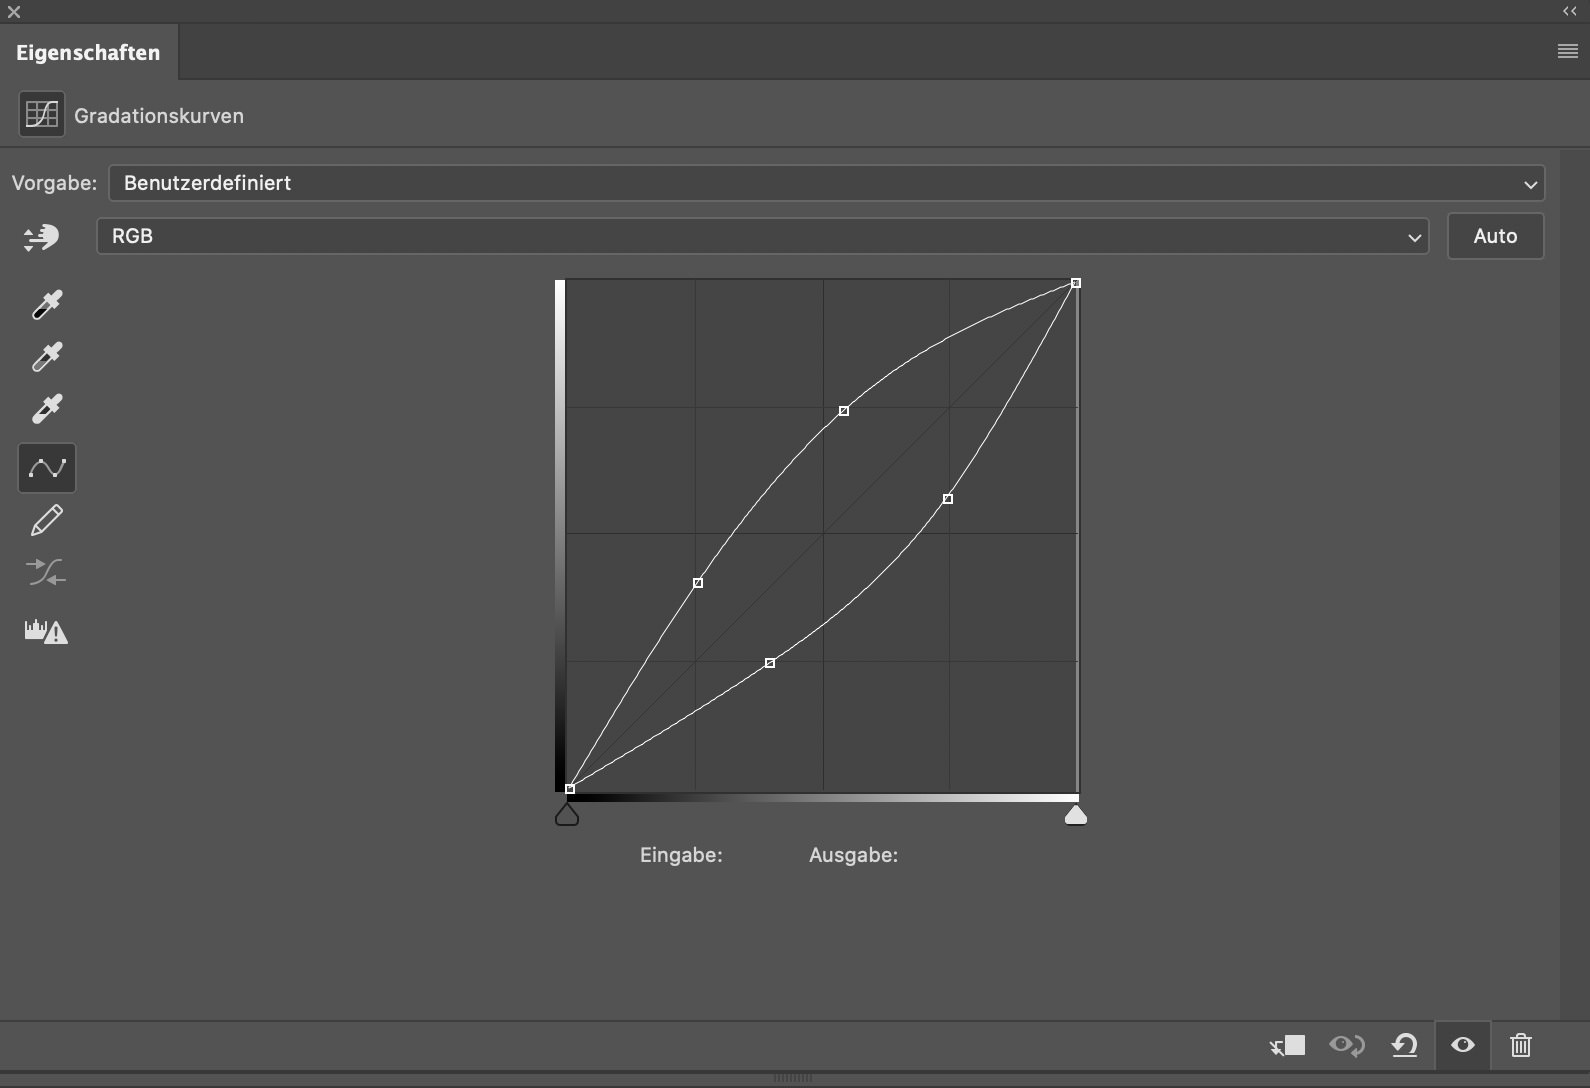
Dodge & Burn Curves
Two curves, one for Dodge and one for Burn, are the optimal solution for using Dodge & Burn. Masking the effect in and out with white and black is straightforward. Switching between layers is easy with the following shortcut:
Windows: Alt +, (down), or Alt +. (up)
Mac: Option +, (down), or Option +. (up)
However, learning how to use curves for Dodge & Burn properly is necessary, as curves can influence not only luminance but also saturation and contrast, and small differences can result in significant changes.
Conny Wallström, a photographer, retouching teacher, and software developer based in Sweden, tested various curves and developed a 2-point gradation curve that reproduces the most natural and realistic way of dealing with color. This curve is integrated into a retouching toolkit, which creates two folders and includes hue/saturation corrections. These hue/saturation corrections are a measure against saturation problems caused by Dodge & Burn and make the most sense when processing skin.
More technical insights into the development of this method:
These curves were created by comparing them with the results of exposure levels from the raw converter in Capture One. The idea was that a raw converter like Capture One reproduces the most natural and realistic way of dealing with color with different exposures without causing color problems or shifts. Therefore, if we use these Dodge & Burn curves, we can expect a natural, realistic result. At the same time, we can work consistently and efficiently, since it is a Photoshop action that always works the same way.
But that’s not all. Many who already use this retouching toolkit know that this action creates two folders, and in addition to the special curves for Dodge and Burn, hue/saturation corrections are included. Here’s why the hue/saturation corrections are necessary:
When we analyze a portrait image , we find that increasing luminance tends to decrease saturation, while decreasing luminance tends to increase saturation. If we only lighten an image based on luminance, the proportion of saturation in the now lighter areas becomes too high (and vice versa). Therefore, using hue/saturation corrections is a measure against saturation problems caused by Dodge and Burn, which saves editing time in retouching.
These hue/saturation corrections are particularly useful when processing skin (skin texture, blood flow in the skin). Of course, this cannot be generalized 100%. Every image requires slight adjustments to the hue/saturation correction layers due to other camera manufacturers and raw formats. Therefore, it is recommended to adjust those layers slightly for each image. However, one cannot avoid looking at the saturation in the image afterward, at least briefly.
Hidden Gems / Tips and Tricks
Pro tip 1: Separately adjusted curves are also useful for very granular, high-contrast structures such as makeup (see example below) and are useful to avoid flattening the contrast.
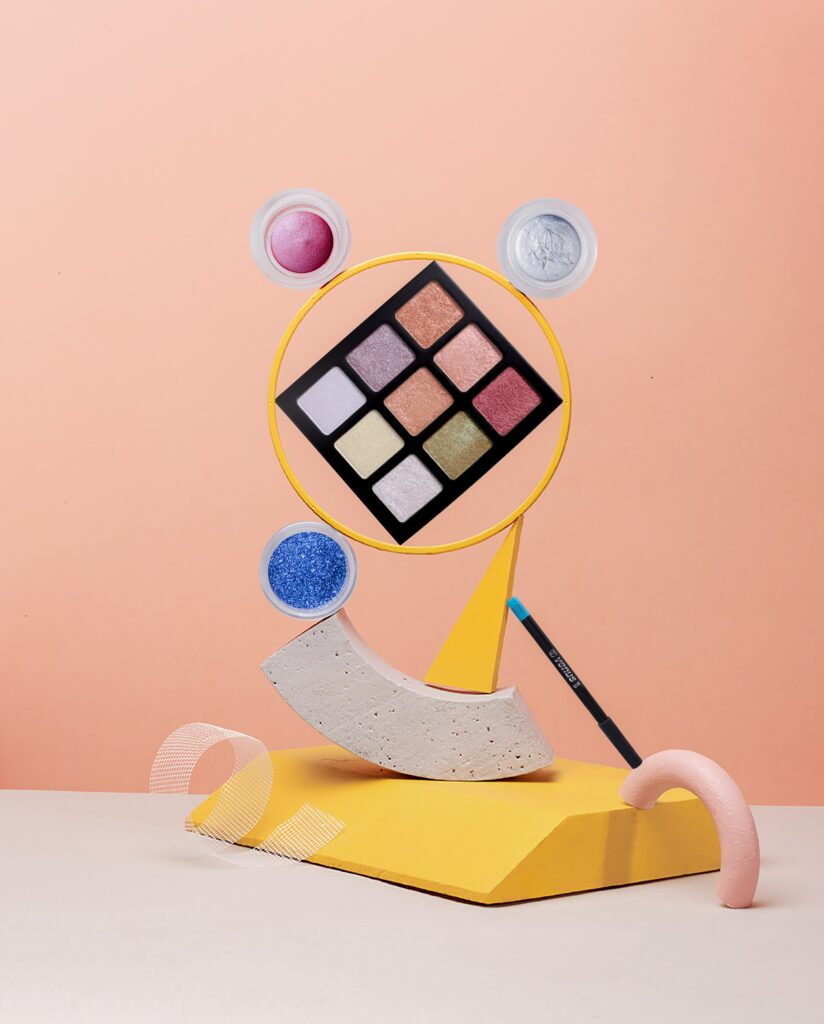
(Photo by 𝐕𝐞𝐧𝐮𝐬 𝐇𝐃 𝐌𝐚𝐤𝐞- 𝐮𝐩 & 𝐏𝐞𝐫𝐟𝐮𝐦𝐞 from Pexels)
Pro tip 2: Additionally, the Dodge & Burn tools work well for eyebrows. If painted on an empty layer, you can achieve a more realistic result by painting individual hairs lighter or darker.
Don’t forget Dodge & Burn is much easier by using Wacom tablets![]() .
.
Looking for more tips and tricks to improve your retouching skills? Check out the other articles in our Retouching Techniques blog section.
Do you have any suggestions, additions, is this post out of date, or have you found any mistakes? Then we look forward to your comment.
You are welcome to share this post. We are very grateful for every recommendation.
Great content! Super high-quality! Keep it up! 🙂
I love this website – its so usefull and helpfull.
Great looking website. Think you did a bunch of your very own html coding.